
How to use Oracle Cloud Services with our Products
July 15, 2020
by Benthic SoftwareAll of our products work very well with Oracle Cloud Services. Whether you're a large business with existing databases in the cloud, a small business moving to cloud databases, or a single user looking to learn how to use Oracle, the Oracle Cloud services are a great way to go. The free tier is very useable with a good amount of storage and easy connection and maintenance options. The Oracle Cloud Infrastructure web site makes it easy to sign up and create a cloud database.
The next step is to get connected to your new database with your favorite database tools from Benthic Software! To do so, you will create, install and configure your Oracle Wallet.
Note that these instructions are for a user setting up their own Oracle Client and cloud connection. Most businesses will have a pre-configured Oracle Client install with all the neccessary wallet files. You'll just need to know the correct database alias to enter in Golden's login window.
How to get your Oracle Wallet
If you are using Oracle Cloud services in your company, check with your database administrator to get your Oracle Wallet or customized Oracle Client instructions. This may already be installed! If you don't have the Oracle Wallet yet, then on Oracle's cloud website, select the database that you've created. Generally this will be an ATP (Autonomous Transaction Processing) database (this is the default for free services.) The very first button under your database name should be "DB Connection". Click it and you'll see the following screen:
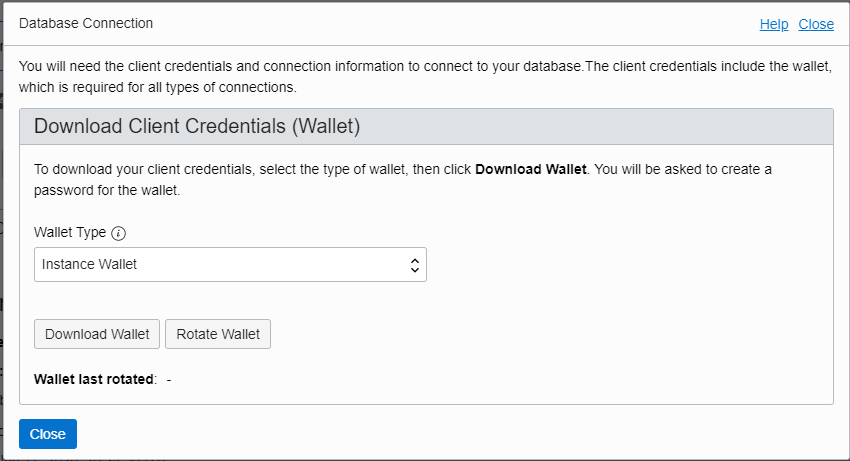
- Click the Download Wallet button
- The wallet download is a standard zip file. It will be named "wallet_[your db name].zip
- Unzip the file to a directory. We like to use "wallet" under your main Oracle_Home directory.
- The files include the wallet itself, and several standard Oracle files and a readme file.
How to use the Wallet files
sqlnet.ora
This is a standard text file with Oracle Client options. If you have an existing sqlnet.ora, you should just add the two lines in this filee to that one otherwise you can just copy this file to the location where the Oracle Client will find it. This will either be the standard location or the location specificied by your TNS_ADMIN setting (which we always recommend using.)
The settings added to your sqlnet.ora file are "WALLET_LOCATION" and "SSL_SERVER_DN_MATCH".
The "WALLET_LOCATION" setting must be changed to the location of your wallet.
In our case we saved it under "c:\oracle\wallet", so our settings look like:
WALLET_LOCATION = (SOURCE = (METHOD = file) (METHOD_DATA = (DIRECTORY="C:\\Oracle\\Wallet")))
SSL_SERVER_DN_MATCH=yes
tnsnames.ora
This is a standard text file with Oracle Client connection aliases. If you have an existing tnsnames.ora file, you should just add the entries from the wallet tnsnames.ora to it. You can also link to the wallet's tnsnames.ora file using Oracle's IFILE syntax. The tnsnames.ora entries include several different aliases which coorespond to useage. If in doubt, use the [your database]_tp one.
Connecting to the cloud
Your Oracle Client should now be ready for use! In the next step we'll use Golden to connect to your cloud database. Note that these instructions are similar for all of our applications.
- Start Golden
- Enter your username and password information in the appropriate fields.
- Enter your Oracle cloud database alias in the "Database" field. This will be something like "clouddb_tp"
- Click login
- Use your Oracle Cloud database! It should work just as well as a local database.
This website uses cookies to enhance your browsing experience and analyze our website traffic and performance. By using this website, you agree to our use of cookies. Learn more about our Cookie Policy in our Privacy Statement.